Now that you are engaged and we have told you a few things to keep in mind before you begin planning, I'm sure you are wondering where to begin. Planning a wedding, no matter how large or small, is a production like no other. Unless you are an event planner or someone who just enjoys this sort of thing, it will quickly consume your life and you will be quickly counting the days for it to end, simply due to the overwhelming feeling that you are feeling. I know it is easy for me to say because I plan events all the time, but as long as you stay on top of things, it will be smooth sailing!! But before we can get to the end, we must start at the beginning. So, here are ten steps to start planning your wedding….
1. Set a budget- This is the first and most important step. Unless you are blessed with a bottomless Tory Burch, Michael Kors, or Louis Vuitton, you must have the conversation with your parents, your family, your fiancé, etc. to decide who will be contributing and how much. There is no reason to begin looking at anything without knowing what you have to spend.
2. Choose 2-3 possible dates- To be safe, it is always important to have a few potential dates chosen. Base your date on an important date to you, a preferred time of year, vacation plans, etc. Even football season here in the South can deter guests from attending a wedding unless you're planning to show the game at your reception.
3. Begin your guest list- Even though you may want to invite everyone you have every known, your guest count is important for multiple reasons. For starters, your venue capacity, catering menu (per person costs), stationary budget, the list goes on and on. Knowing who are "must haves" and having that count will help to determine how many "wants" and "sorta wants" to invite. For example, if your list already contains 100 "must haves" and your budget is $30,000, you theoretically have $300 to spend per guest. Once you take other expenses (your dress, flowers, band/dj/ photography, etc), that number will lessen and you will easily see how many people you can comfortably add.
4. Decide on the style/feel of your wedding- I know the word "theme" sounds so cheesy and sends people running for the hills, but everyone has a distinct wedding style and there are so many to choose from. Whether it is a style (glam, preppy, rustic, southern, etc.) or based on a specific color scheme, there is a vision you have in mind for your wedding. You don't have to plan each detail, but have an idea or focus of what you want so that you can move forward in your planning.
5. Decide what is important- Most checklists tell you to book your venue here. While that is a very important and logical next step, we at Over the Top want you to take a moment to discuss with your fiancé what is most important to y'all. Sometimes it is the venue, but sometimes it is the photographer, the videographer, the caterer, etc. One local videographer I have worked with can be booked almost 2 years out. Securing one vendor may determine the date for the wedding and if you book a venue too quickly, it may result in missing the one vendor that is the most important thing to you.
6. Start researching- Once you have decided on steps 1-4, it is time to start doing some research. Start researching the thing (vendor) that is most important to you, as well as top venues (if that is not the most important thing) and begin scheduling appointments. These are the most important things to have booked- contacts signed and deposits made- before proceeding with the remainder of your wedding planning.
7. Keep researching- If you have not considered hiring a wedding planner at this point, now is a good time to consider it. Wedding planners can be invaluable to you. Many consider it to be an extra cost, but it should be factored into the budget, just like flowers and food. I will be posting about this soon, but for now I will leave it at that.
Moving on, now is the time to begin researching and interviewing your remaining vendors to round out your wedding day needs. These typically include: florist, baker, entertainment, caterer/liquor, photographer, videographer, rentals, transportation, stationary/invitations, tux rental, hair/make-up, favors, etc. Each vendor tends to have their own style and something to offer. Use word of mouth and references to help guide you, in addition to your own research. It is a general rule to thumb to never interview more than three in any one category. Once you meet with a vendor and know what they have to offer compared to what you want and need, an easy decision on who to hire usually follows.
8. Hire your remaining vendors- Once all meetings are done, it is time for decisions. Continue on with signing contracts and making deposits. Some of these must be done in order. For example: you can't visit a rental company before you know the venue and what you will need to rent. You probably can however visit a rental company before you visit the bakery because adding a cake stand later tends to not be a big deal. But you can make sure the said rental company isn't already renting out to four other weddings in town on your wedding day.
9. Design Details- Now that vendors are booked, they are going to start wondering exactly what they are going to be doing, especially the ones who are expected to create something. Now is the time to begin looking deeper into your initial wedding style for specific inspiration and details you want. Pull pages from magazines, make a new boards on Pinterest, anything you need to do to start your collection to show. Vendors can't read your mind and everyone's own definition of a single concept can end up in disaster and an unhappy bride. Visual cues and inspiration help to keep everyone on the same page.
10. Wedding Dress Shopping- The day every little girl dreams of! Well, most every little girl…. My piece of advice to you- be choosy about who you take with you when shopping. Your mother is not going to want to miss this day and it is good manners to also invite your future mother-in-law. Your sister(s), future sister(s)-in-law may appreciate an invitation, and best friend/maid/matron of honor also may like to come, but bringing your entire bridal party tends to be unnecessary for multiple reasons. You don't want to take away from the special-ness of the moment with your mother, but you also don't want to open yourself up to 25 opinions by having a posse with you. A way to include everyone in this is to invite your bridesmaids to a fitting once the dress is decided upon. It is your choice who to invite, but it is important to think it through before issue invites freely. Wedding dresses typically take a long time to come in and almost always need alterations, so it is a good idea to start on this task early.
Remember that no matter what step in the process you're at, take a deep breath and take one step at a time. It will all come together and will work out beautifully!!!
XO,
Brittany

Monday, April 14, 2014
Tuesday, March 11, 2014
Wedding Season is Upon Us
Now that I have spent some time and a few blog posts focused on a super fun and super girly clamping party, I want to devote some time to the basics of wedding planning. Over the course of the next few weeks and over multiple posts, I hope to help those of you who are newly engaged and about to begin the exciting journey from Miss to Mrs.
My first post will focus on 10 things that are important to know (and to not forget) before starting and to hang on to while planning your wedding.
1. You don’t have to hire vendors that are all in the same immediate location that your wedding is occurring in. Most cities have other cities/towns that surround them, right? In Fairhope, most of us have the mindset to use only vendors in Fairhope and there are some great vendors here. BUT depending on your needs, you may need to look to Mobile, Pensacola, Mississippi, or even New Orleans for vendors. Often times, vendors will travel up to a 45-mile radius without an extra charge and depending on how much farther it is, there may be little to no extra charge incurred.
2. You want to hire vendors who you feel close to- who feel like they’re your friends. You’re going to be spending a long time with them- you want to be comfortable and have fun with your vendors! Well, I didn’t even consider this when hiring my vendors… BIG mistake. Fun shouldn't be a deciding factor when hiring vendors. It is true that you want to feel comfortable with your vendors, but there are more important factors to consider, such as professionalism, experience, style that matches your vision, and ability to properly communicate your needs and wants.
3. When researching vendors, you can’t compare “apples to apples”. Why not? Because everyone is different. Everyone has different levels of experience, different services, different packages. Yes, it makes it tough to make a decision, but if you end up comparing “apples to apples”, you’re doing yourself a disservice, because you’re most likely going to end up with the short end of the stick. For example, you may hire a photographer because they were the cheaper option out of everyone you meet with. Yet you will still ended up paying what the others were priced at by the time everything was said and done.
4. Know your options! It’s totally fine to meet with a few different vendors- you need to know your options so you can make an informed decision! Don’t feel bad about it. But at the same time, don’t get too carried away with the options. A good rule of thumb: do your research first, and then schedule consultations with your top 3 options.
5. Having a huge bridal party isn’t all that it’s cracked up to be. Yep, I said it. And this new trend of "honorary" bridesmaids is just an excuse to add more bridesmaids to an already high number. Having more members of your bridal party does not guarantee that you will have more helpers. In fact, it can almost always ensure a bigger headache trying to coordinate them all.
6. Read your contracts! Yeah, I know- it’s kinda boring. But when you don't, you may not have a photographer to capture your exit or your wedding planner may not be on site at your ceremony. Make sure what you’re expecting is what you’re actually getting. Which leads me to…
7. Communicate with your vendors. The thing is, you want to communicate with your vendors- about everything. Share with them what your vision is for your wedding. What you are expecting out of them, and how you want your wedding to be. And you know what? If anything, it helps everyone involved in your wedding!
8. Prioritize….and DON'T Procrastinate! When you first pick a date or are trying to decide on a date or are beginning with your budget in mind, always start with the thing that is most important to you and your fiancé. It may be the location, the food, the photography. Whatever you feel is the most important and you can't live without, book that first and work around that. Also, as your wedding gets closer, whatever you can do ahead of time- do it! Don't wait to do anything that can be done earlier. The closer you get, the faster time will go!
9. Don’t be afraid to do things differently. Do what you want- what reflects YOU. Don't be afraid to think outside of the box, even for little things like menus and favors! They will end up being your favorite things about your wedding because they were your ideas that you was able to create and reflected you!
10. First looks are GOOD things. Seriously. You will cherish these moments and photos for a lifetime. While the wedding and celebration with family and friends are amazing, the real point of the day is the marriage of the two of you. Don't miss out on capturing this.
Monday, February 24, 2014
Glamping Party
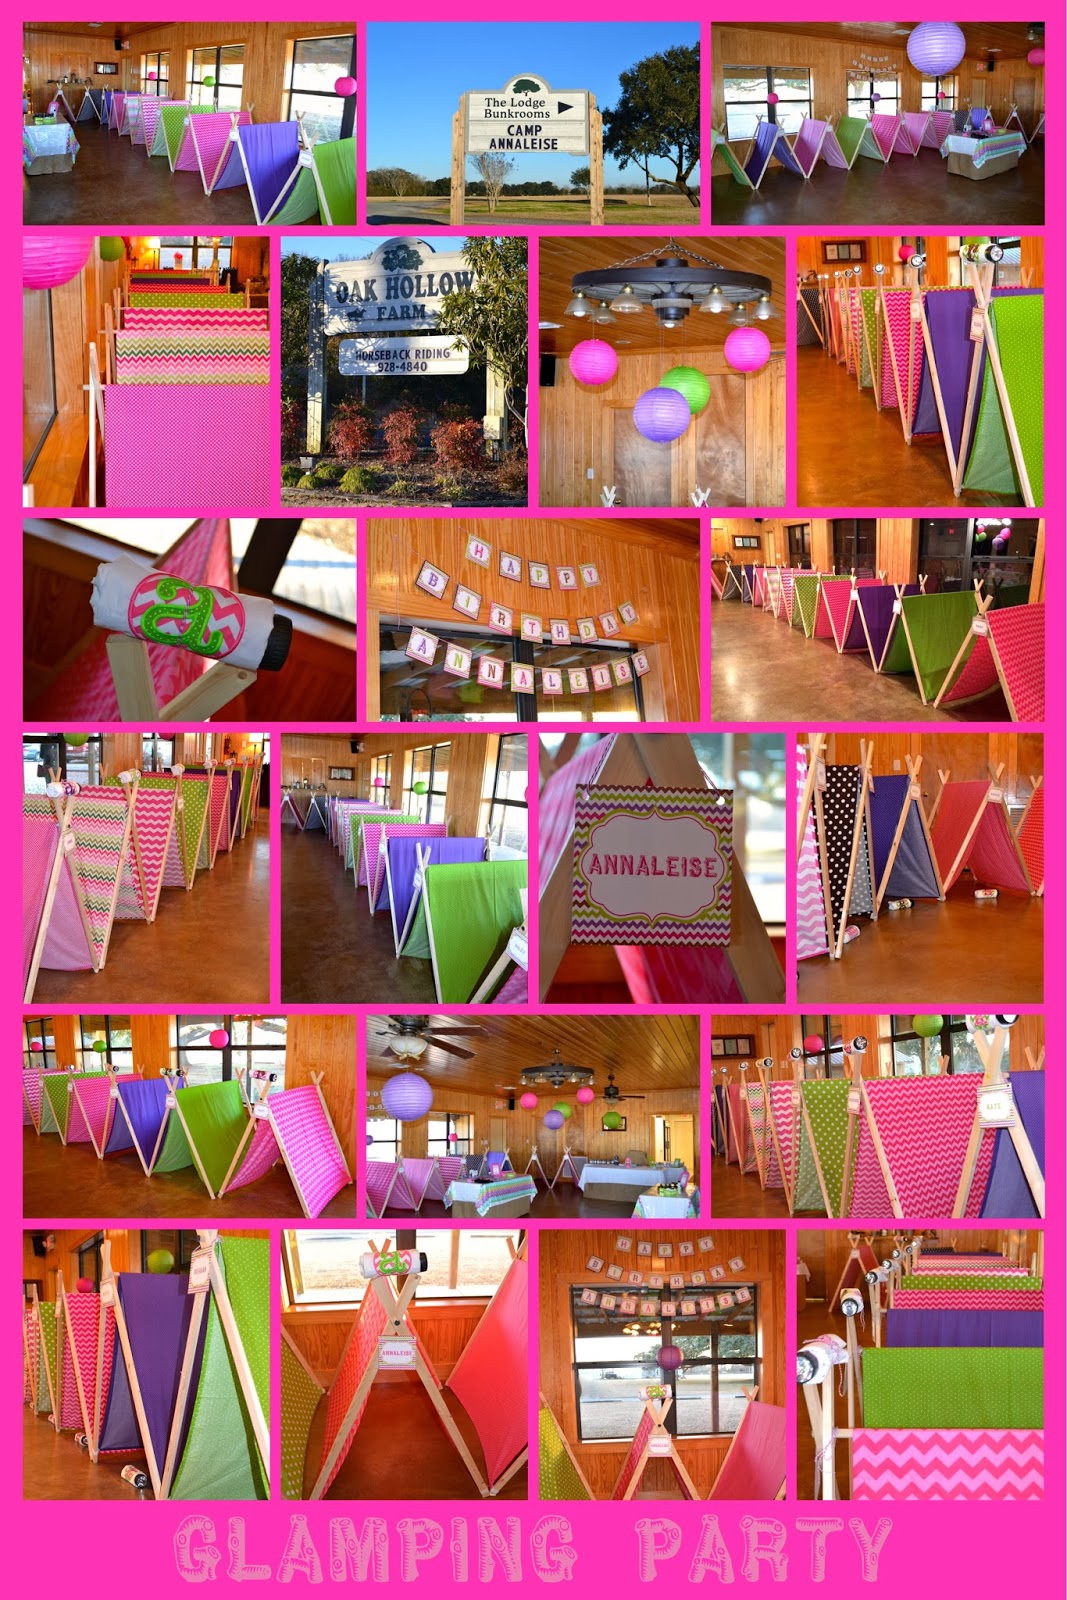
Finally….Here are the setup and layout pictures from the Glamping Party in January for a very special 7 year old's birthday party!! I know y'all have anticipated the final product after the other posts regarding the initial planning stages and tent how to…. Well, here it is! :)
Location- The Lodge at Oak Hollow, Fairhope, AL
Food- Dinner: Pizza from Papa John's, Fairhope, AL
Breakfast: Cereal Bar and Milk
Cake- Wendy Hays, Spanish Fort, AL
Favors: Tents, made by me and Personalized Appliquéd Pillowcases, made by The Royal Princess
Activities: Beauty Bar for hair and nails, Mani/Pedi Station, and S'Mores
All paper goodies (invites, trail mix labels, tent tags, birthday banner, framed signs) and s'mores kits made by Over the Top Events (me!).
I can't emphasize how much fun this party was!!! The girls and moms who stayed had a blast!!! Enjoy! :)
XO,
Brittany
Sunday, February 23, 2014
Julie and Jonathan's After Rehearsal Dinner, Wedding and Reception
I guess I have been so busy with work that I have gotten behind on posting! Here are photos from an after-rehearsal dinner, wedding and reception we were privileged to be a part of in November 2013. When we were contacted in September for an initial meeting, a date had not even been set. We met with our potential bride on September 12 and in 9 short weeks, Julie and Jonathan were married on November 16!! Julie aspired to a very glamorous French themed wedding with a neural color palette and I think we achieved just that! While there were traditional elements, there were quite a few things that she wanted that were unique, such as a crepe cake at her reception. This is by far one of the most beautiful weddings I have had the honor to work on and it turned out beautiful, if I do say so myself. I have been doing this for a long time and judging by the photos, I would bet that people would never believe that we started from scratch and made this happen in just 9 weeks. Enjoy :)
After-Rehearsal Dinner:
Location and Catering:
Tamara's Downtown, Fairhope, AL
Flowers- Fresh Market, Daphne, AL

Wedding and Reception:
Location and Catering- The Venue, Fairhope, AL
Bakery- Sweet Beach Bakery, Gulf Shores, AL
Photography- JFay Photography, Robertsdale, AL
Rentals- Port City Rentals, Mobile, AL
Draping and Lighting- Southern Sounds, Daphne, AL
Entertainment- Rockin' Dopsie and the Zydeco Twisters, New Orleans, LA
Florist- Southern Veranda, Fairhope, AL
 ***Photo Credit- All Photos in above collage by JFay Photography.***


After-Rehearsal Dinner:
Location and Catering:
Tamara's Downtown, Fairhope, AL
Flowers- Fresh Market, Daphne, AL
***Photo Credit- In the above collage, JFay Photography- First row, Second photo, Second Row, second and fourth photos, and third row, second photo.***
Wedding and Reception:
Location and Catering- The Venue, Fairhope, AL
Bakery- Sweet Beach Bakery, Gulf Shores, AL
Photography- JFay Photography, Robertsdale, AL
Rentals- Port City Rentals, Mobile, AL
Draping and Lighting- Southern Sounds, Daphne, AL
Entertainment- Rockin' Dopsie and the Zydeco Twisters, New Orleans, LA
Florist- Southern Veranda, Fairhope, AL
XO,
Brittany
Saturday, February 1, 2014
Glamping Tents
I survived the glamping party!! We had 24 girls at the party (which was much higher than the typical attendance rate!) and they all had a BLAST!!! I will be posting more photos and other details later, but for now, I want to focus on the tents as I promised in my last post. I succeeded in making each girl their own tent! They were able to sleep in them and take them home as part of their favor. Their other favors were trail mix, personalized pillow cases, and flashlights, all of which were huge hits at the party!
Here is a panoramic shot of the tents before the girls arrived

Now, on to the most important part- how to make these tents!! It really was easy.... Well, as easy as sewing and drilling can be. So, lets get started!!
Here is what you will need for a tent:
(roughly) 2.5 yards of material (44" wide, 85.5" long)
coordinating thread
4- 5" long x 3/4" wide elastic strips
4- 1"x2"x48"whitewood moulding pieces
1- 3/4"x 48" dowel rod
drill with 3/4" spade bit
Household extras: measuring tape, pencil, sewing pins, iron, scissors
Now.... Let's get started!
1. Choose your fabric. Most fabrics come 44" wide. Make sure to measure your length to 85.5 and cut accordingly, as straight as possible.
Here are the fabrics I chose to use to match the invitation and other elements of the party:


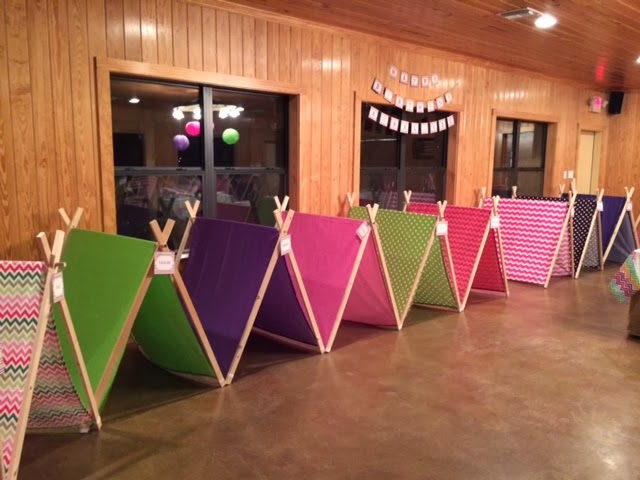
Here is a panoramic shot of the tents before the girls arrived
Now, on to the most important part- how to make these tents!! It really was easy.... Well, as easy as sewing and drilling can be. So, lets get started!!
Here is what you will need for a tent:
(roughly) 2.5 yards of material (44" wide, 85.5" long)
coordinating thread
4- 5" long x 3/4" wide elastic strips
4- 1"x2"x48"whitewood moulding pieces
1- 3/4"x 48" dowel rod
drill with 3/4" spade bit
Household extras: measuring tape, pencil, sewing pins, iron, scissors
Now.... Let's get started!
1. Choose your fabric. Most fabrics come 44" wide. Make sure to measure your length to 85.5 and cut accordingly, as straight as possible.
Here are the fabrics I chose to use to match the invitation and other elements of the party:
2. Once your fabric is at the right length, it is time to pin the edges in preparation of sewing the hem. I am not a sew-er, so I find it much easier to iron the edges before pinning for maximum straightness. A one inch hem on either side is good for these and most times, I would fold half an inch, then fold over again another half an inch to make sure it was straight before I pinned it because the cuts were usually not straight. Here are a few photos of this taking place:
3. Once pinned, you are ready to sew! Now, it is just a basic straight line on the sewing machine. Once all four sides are sewn, attach your elastics to each corner. These will be used to attach to the 1x2s used as the legs of your tent. There is no special method for sewing these other than just going back and forward multiple times to ensure they are attached extremely well.
4. Now that the tent cover is done, time to move on to the frame of the tent. This is very important--- From the top of each of the 4 1x2 whitewood pieces, measure across and mark at 1" and measure and mark 6" down with your pencil. This should give you a center mark 6" down and indicate exactly where you should drill. Now, put on your safety glasses, pick up your drill, and get to work!
5. Once your holes are drilled, place two of the whitewood pieces on top of each other with the holes lined up. Push the dowel through the holes-- Warning-- it will be a tight fit. You may need to use a rubber mallet to help it through. Be very careful if you need to "help" the dowel in and DO NOT use a hammer. Repeat this on the other side. Then spread the tent legs to desired width. Due to our tents being on concrete, we added a screw on both sides at the top, right at the "X" where the "legs" cross to hold it at the desired open width.
5. Now, put your tent cover on and slip the elastic through the legs of your tent and ENJOY!!
XO,
Brittany
Subscribe to:
Posts (Atom)